Convert PDFs to Audiobooks with Machine Learning
Ever wish you could listen to documents? In this post, we'll use machine learning to transform PDFs into audiobooks.
This project was a collaboration with Kaz Sato.
Update: Many of you have asked me what the total cost of this project is, which I've included at the end of this post. TLDR: it was free.
Walking--it's one of covid-19's greatest (and only) pleasures, isn't it? These days, you can do anything on foot: listen to the news, take meetings, even write notes (with voice dictation). The only thing you can't do while walking is read machine learning research papers.
Or can't you?
In this post, I'll show you how to use machine learning to transform documents in PDF or image format into audiobooks, using computer vision and text-to-speech. That way, you can read research papers on the go.
But should you? That's for you to decide.
Want to jump straight to the code? Check it out on GitHub here. Or, watch the video
But first: Credit to Kaz Sato, a Google engineer based in Japan who originally created this project (he was creating Japanese audiobooks from Computer Science textbooks). I took borrowed architecture with a few little tweaks.
We’ll build our PDF-to-audiobook converter in three main steps:
- Extract text from PDFs (or images)
- Decide which parts of the text to include in the audiobook
- Convert the text into spoken words
In this post, I'll show you how to convert this dense research paper (“A Promising Path Towards Autoformalization and General Artificial Intelligence”) into an audiobook. Here’s what it looks like:

From PDFs to Text
First, we’ll extract the text from the document using OCR. You could use lots of different types of tools to do this, like:
- Calamari, on open-source Python library
- The Google Cloud Vision AI API
- The (new!) Google Cloud Document AI API. This API extracts not only text but also intelligently parses tables and forms
For this project, I used the Vision API (which is cheaper than the new Document AI API), and found the quality to be quite good. Check out Kaz's GitHub repo to see exactly how you call the API.
When you pass a document through the Vision API, you’re returned both raw text as well as layout information. Here's what the response looks like:
As you can see, the API returns not just the raw text on the page, but also each character's (x, y) position.
At this point, you could take all that raw text and dump it straight into an audiobook, if you're a doofus. But you're not a doofus, and you probably don't want to do that, because then you'd be listening to all sorts of uninteresting artifacts like image captions, page numbers, document footers, and so on.
So in the next step, we'll decide which bits of raw text should be included in the audiobook.
Finding Relevant Text in PDFs
What part of a research paper do we want to include in an audiobook? Probably the paper's title, the author's name, section headers, body text, but none of these bits highlighted in red:

It turns out identifying those relevant sections is a tricky problem with lots of possible solutions. In this post, I'll show you two approaches, one that's quick 'n dirty and one that's high-quality but a bit more work.
Finding Relevant Text with Machine Learning
When you look at a research paper, it's probably easy for you to gloss over the irrelevant bits just by noting the layout: titles are large and bolded; captions are small; body text is medium-sized and centered on the page.
Using spatial information about the layout of the text on the page, we can train a machine learning model to do that, too. We show the model a bunch of examples of body text, header text, and so on, and hopefully it learns to recognize them.
This is the approach that Kaz, the original author of this project, took when trying to turn textbooks into audiobooks.
Earlier in this post, I mentioned that the Google Cloud Vision API returns not just text on the page, but also its layout. It groups text into chunks (pages, blocks, paragraphs, words, and characters) and returns its location on the page. In particular, for each word, it returns a bounding box that looks like this:
"boundingBox": {
"normalizedVertices": [ {"x": 0.9248292,"y": 0.06006006}, {"x": 0.9384966,"y": 0.06006006}, {"x": 0.9384966,"y": 0.067567565}, {"x": 0.9248292,"y": 0.067567565} ]
}
The bounding box above describes where a word is located on the page, and how large it is.
We can use this data to train a model. Let's take a look at the data that Kaz collected below:
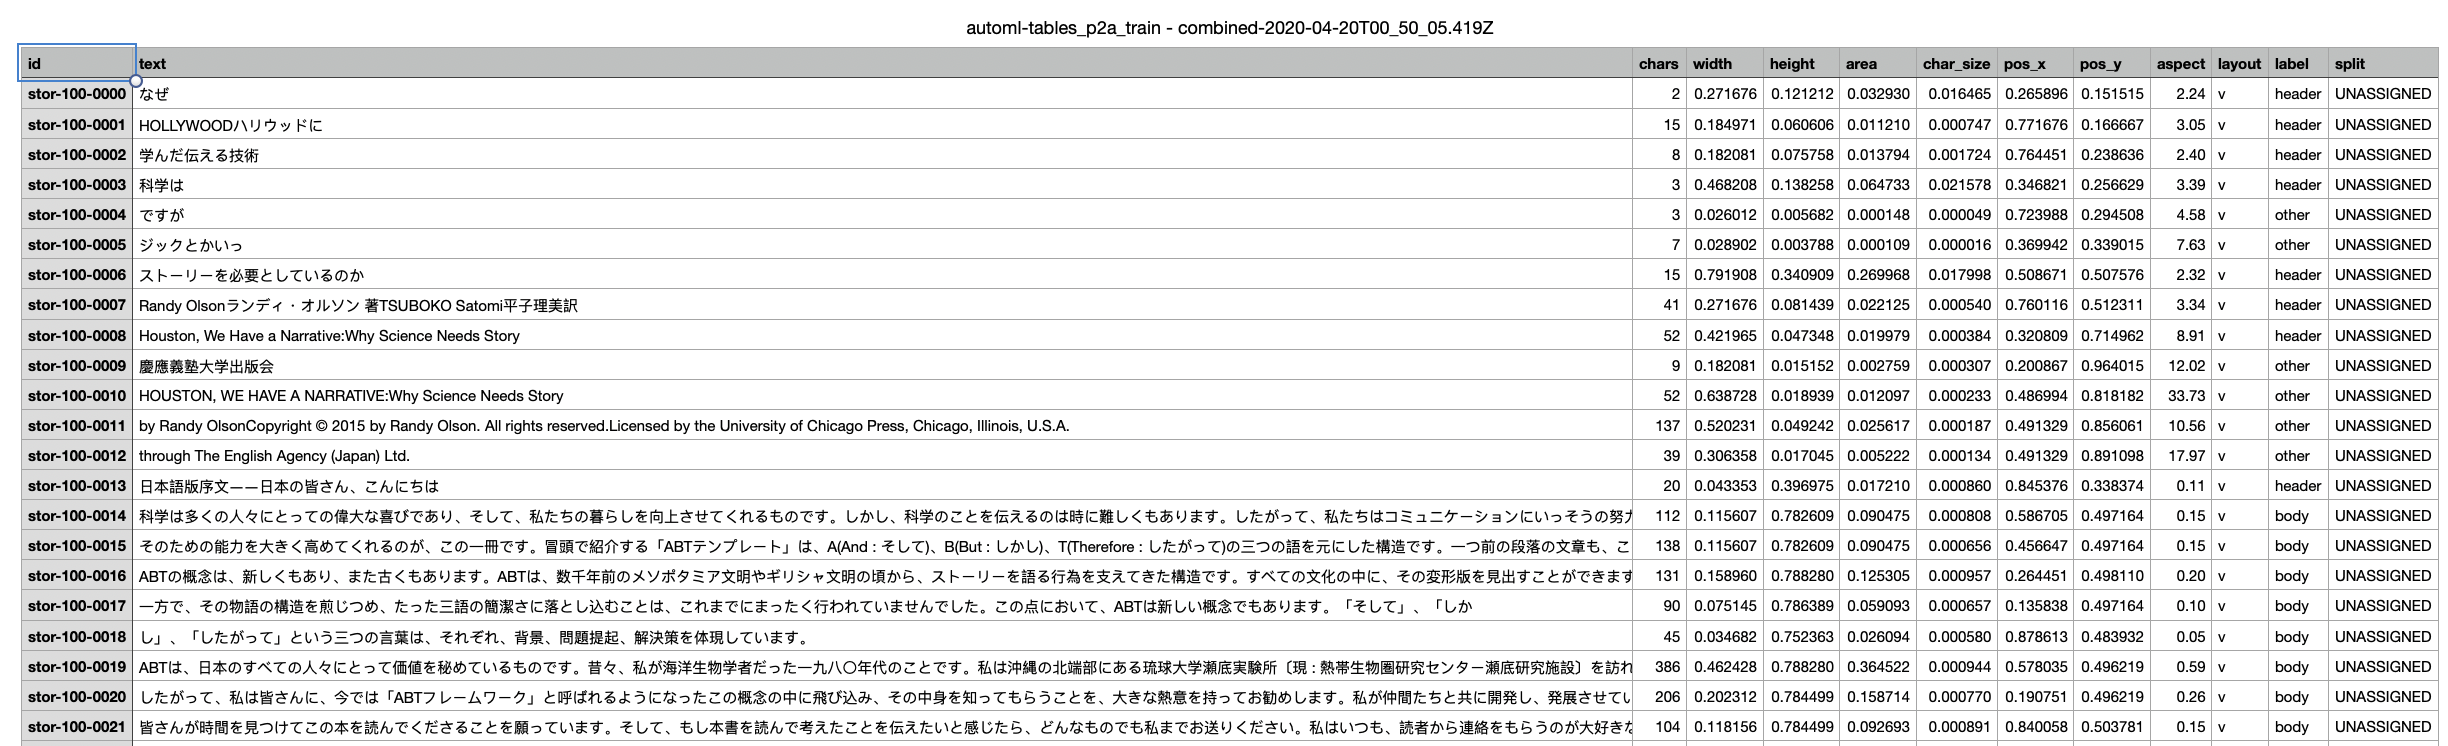
The book Kaz was converting was, obviously, in Japanese. For each chunk of text, he created a set of features to describe it: how many characters were in the chunk of text? How large was it, and where was it located on the page? What was the aspect ratio of the box enclosing the text (a narrow box, for example, might just be a side bar)?
Notice there's also a column named "label" in that spreadsheet above. That's because, in order to train a machine learning model, we need a labeled training dataset from which the model can "learn." For each block of text in the training data, Kaz had to manually label the chunk as "body," "header," "caption," or "other." Labeling training data is always one of the more time-consuming parts of ML projects, and this one was no exception!
That's why, when I recreated Kaz's project, I used a hack to avoid it (more on that below).
After Kaz collected and labeled a bunch of documents, he trained a machine learning model using Google Cloud AutoML Tables. It's a no-code tool for building models based on tabular data. Here's a little gif showing what that tool looks like, and how Kaz used it to train a model:

As you can see, the model was quite accurate (~95% precision and recall)! So Kaz used this model as an intermediary step to identify which text to put in the audiobook.
Finding Relevant Text with Spit and Glue and Font Sizes
Look, I'm no sissy--I've spent a lot of my life labeling training data (even though, these days, you really don't have to). But for this project, I wondered if I could use a simple heuristic (one that would let me avoid labeling data) instead.
I figured you could learn a lot just by looking at font size. For example: the title of a paper is probably written in the largest text size. Meanwhile, body text is the most common text in a document. Using those observations, I used this heuristic:
- Calculate the font size for all words
- Compute the most common font size. Label ever bit of text in that font size "body"
- Compute the largest font size. Label every bit of text in that font size as "title"
For the first step, computing font size, I subtracted the y coordinates around words:

Next, to see if my idea would work, I plotted the distribution of font sizes in the document:
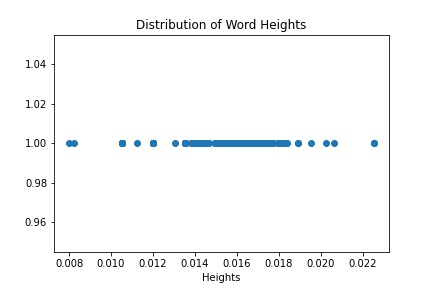
You can see that on the right hand side, there's a single dot (the largest text) that represents the document title (woohoo!). Meanwhile, that long span of points in the middle, that's the body text. The captions and other document metadata, which is in even smaller text, is all the way on the left side of the diagram.
This graph gave me confidence that my little hack would work, at least for this document (note that it didn't work for all research papers, especially not papers with fancy side bars or vertical layouts!).
One tricky bit here, though, is that the body text font size falls in a range (not one fixed value). That's because I'm not computing font size like we usually think of it (i.e. 12 pt), but as subtracted pixel values, and there's some noise. To figure out the cutoffs (i.e. what should be the bounds for what's considered body text?), I used Jenks Natural Breaks Algorithm (if you haven't heard of this one, no fear--neither had I before this project!).
I know I'm being a little quick here, so feel free to drop me comments below here or on Twitter and I'll definitely answer questions!
From Text to Spoken Word
The most fun part of this project is definitely choosing a computer voice to be our narrator. For this, I used the Google Text-to-Speech API, which uses a technology called WaveNet to produce very lifelike voices. The API supports lots of voices and languages, and you can compare them for yourself on your own input text straight from the product page.
I choose a male voice to read the paper title and a female voice to read the paper body. Here's what the resulting "audiobook" sounded like:
Not too bad, right?
Pricing
Since publishing this post, many of you have asked me how much it cost me to build this project. Conveniently, I stayed in the free tier of the APIs I used. For reference:
I didn't build a custom model (like Kaz did), so I'll just focus on the cost of 1) extracting text from a PDF 2) converting text to audio.
The cost to convert a PDF to text using the Google Vision API is free for under 1000 pages (see the pricing page here).
Converting text to speech using WaveNet voices is free up to 1 million characters (see the full pricing page here).
Anyway, that's all for now.
If you build something neat like this, share it with me and I'll feature it on social media!