Building an AI-Powered Searchable Video Archive
In this post, I'll show you how to build an AI-powered, searchable video archive using machine learning and Google Cloud--no experience required.
One of my favorite apps ever is definitely Google Photos. In addition to backing up my precious pics to the cloud, it also makes all of my photos and videos searchable using machine learning. So if I type "pool" in the Photos app, it returns all everything it recognizes as a pool:

This is all well and good if you just want to use somebody else's software. But on this website, we build our own PCs, store our own encryption keys, churn our own butter, and build our own Google Photos Videos app.
But not for nothing, there are lots of good reasons to build your own video archive. For one, it's fun. For two, you can add features Google Photos doesn't currently support, especially for videos. Like searching by what people say (transcripts), in case you need to find all the clips where someone says, "well now we have it on film," or "oh sh*t." For three, building your own app allows you to more easily integrate with your other software and control how your data is stored and handled. For example, I built my archive's backend on Google Cloud, which let me take advantage of Google Cloud's privacy, security, and compliance guarantees.
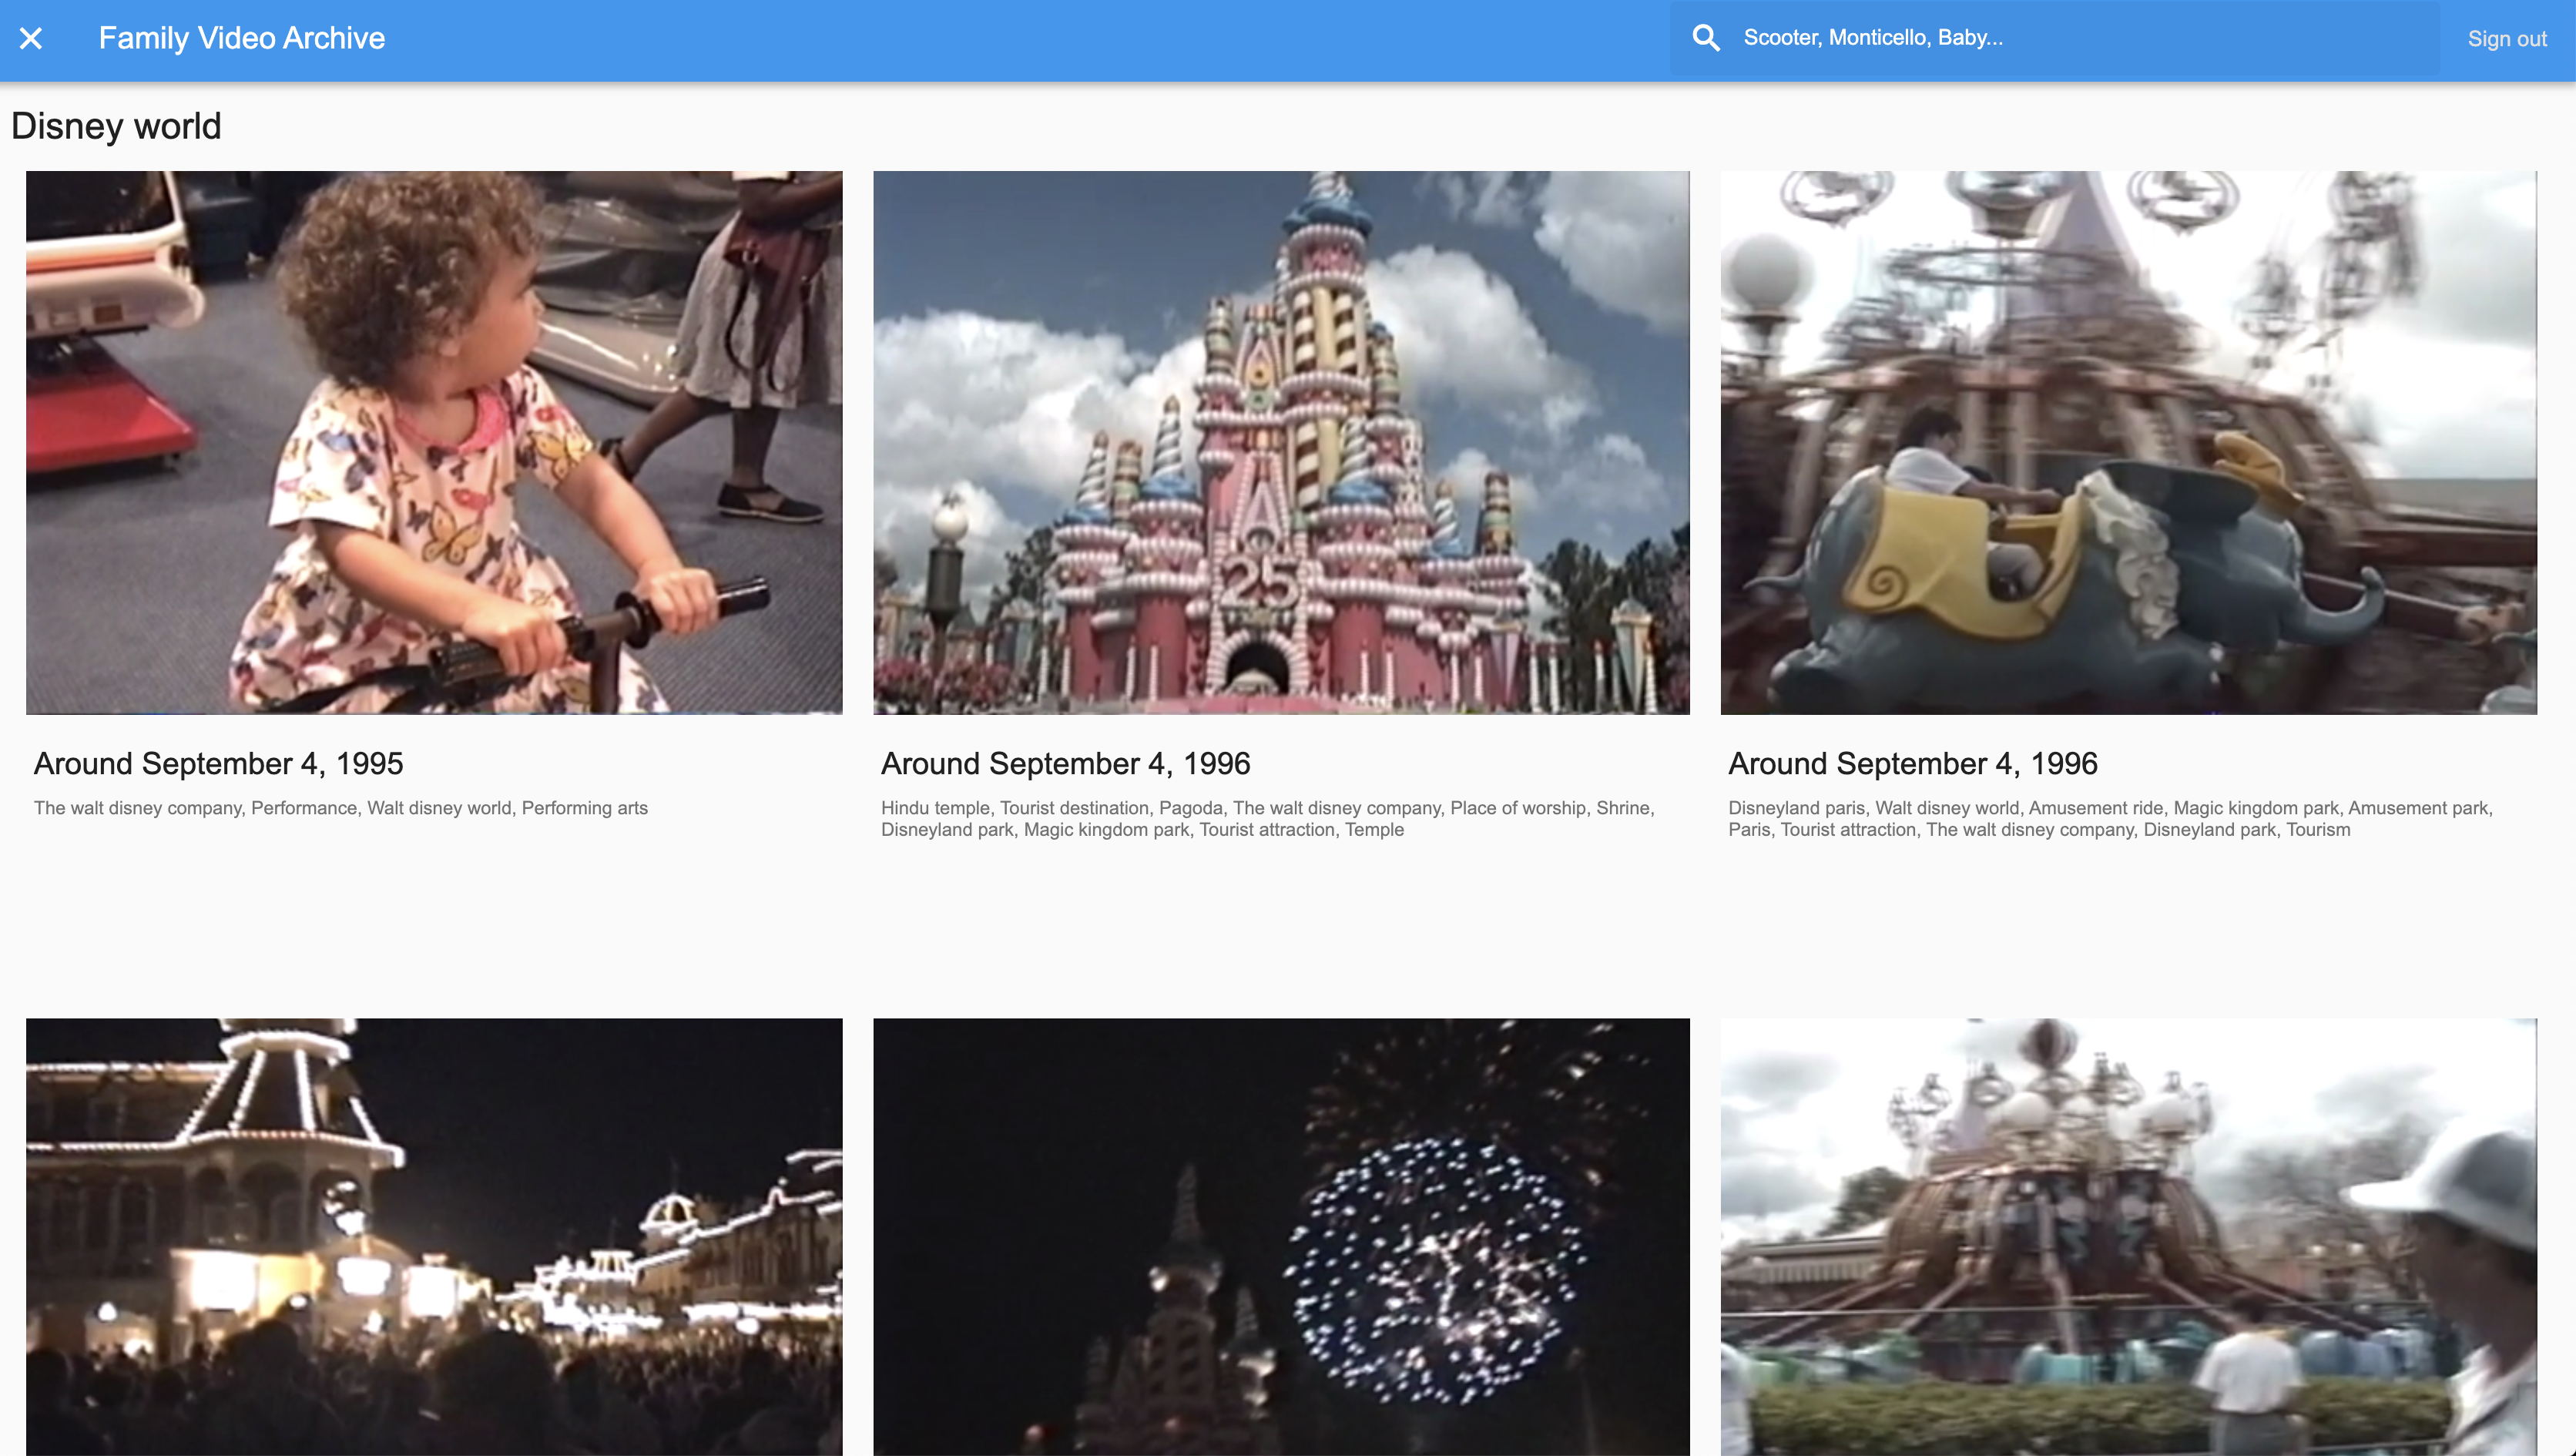
My searchable video archive ended up looking like this:

and it stored and indexed all of my family home videos (~126 GB). Using machine learning, specifically the Video Intelligence API, I was able to do all sorts of analysis, including automatically splitting long videos, identifying objects and scenes, transcribing audio, and extracting on-screen text.
The app ended up being extremely good at searching for cute moments. Using computer vision, it recognized scenes and objects like "wedding," "firework", "performance," "baby laughing", "home improvement," "roller coaster," and even "Disney World":
It could also search transcripts. This is how I found the clip of my very first steps, because in these clips, my parents say something like, "Look, Dale is taking her first steps!":

Finally, the tool was able to search any on-screen text, like the words "Mets" and "New York" on these players' shirts or the "Bud" poster in the background:

The video archive ended up being a pretty good Father's Day gift, especially since I wasn't actually able to see my dad in person this year.
In this post, I'll show you how you can build your own archive, just like this. But if you want to skip straight to the code, check out the Making with ML Github repo.
Machine Learning Architecture for Video Processing
The app is divided into two bits, the frontend and the backend. The backend was built using a combination of Google Cloud, Firebase, and a tool called Algolia (for search). The frontend was built with Flutter, a framework for building web and mobile apps, but could have easily been a React or Angular or iOS or Android app.
The backend architecture looked something like this:

I use this kind of architecture or pipeline all the time when I build apps that tag or index data with machine learning. It works like this:
- First, data (in this case, an individual video) is uploaded to a Google Cloud Storage bucket.
- Uploading kicks off a Cloud Function (this is like an AWS lambda, i.e. a small chunk of code that runs in the cloud)
- The cloud functions calls the Video Intelligence API to kick off video analysis
- The Video Intelligence API writes its results as JSON to a second storage bucket
- That written data, in turn, kicks off a second cloud function that parses the JSON and writes it to a more convenient data store--in this case Firestore and Algolia.
From here, my frontend Flutter app could talk to the backend and search for user queries. If these technologies are unfamiliar to you, fear not--I'll go into depth in a bit.
There are also a couple of steps I couldn't fit in that diagram. For example, I did a bit of preprocessing with the Video Intelligence API on some very long video files that split them into smaller clips, and that also identified any timestamps shown on screen. Also, I wrote a Cloud Function specifically for taking an uploaded video and generating a thumbnail for it (check out this function).
Quickly Transferring Video from Drive to Cloud Storage
But first, before we get into the weeds, let's talk about transferring data from Google Drive to Cloud Storage. In theory, moving data from Drive to Storage should be fast, since all the data can stay within Google's network. But frustratingly, in practice, there's no slick way to do the transfer. Happily, I found a neat hack in this Medium article by Philipp Lies. The trick is to use a Colab notebook--a free, educational Google tool for running Python code in the cloud--to do the transfer. It's quick, easy, and very effective!
The Video Intelligence API
The key tool that made this project possible was the Video Intelligence API built by Google Cloud. It takes a path to a video in Cloud Storage and spits out, among other things:
- Audio transcriptions (i.e. “automatic subtitles”)
- Known objects (e.g. plane, beach, snow, bicycle, cake, wedding)
- On-screen text (i.e. on street signs, T-shirts, banners, and posters)
- Shot changes
- Explicit content detection
This data can then be used as indices we can use to search for specific videos.
The Price
If you're me, your first thought is, sure, but I bet it's super expensive. I analyzed 126 GB of video or about 36 straight hours, and my total cost using this API was $300, which was kind of pricey. Here's the cost breakdown per type of analysis:

I was surprised to learn that the bulk of the cost came from one single type of analysis--detecting on-screen text. Everything else amounted to just ~$80, which is funny, because on-screen text was the least interesting attribute I extracted! So a word of advice: if you're on a budget, maybe leave this feature out.
Now to clarify, I ran the Video Intelligence API once for every video in my collection. For my archive use case, it's just an upfront cost, not a recurring one.
Using the API
Using the Video Intelligence API is pretty straightforward once you've got your data uploaded to a Cloud Storage Bucket. (Never heard of a Storage Bucket? It's basically just a folder stored in Google Cloud.) For this project, the code that calls the API lives in video_archive/functions/index.js and looks like this:
const videoContext = {
  speechTranscriptionConfig: {
    languageCode: 'en-US',
    enableAutomaticPunctuation: true,
  },
};

const request = {
  inputUri: `gs://VIDEO_BUCKET/my_sick_video.mp4`,
  outputUri: `gs://JSON_BUCKET/my_sick_video.json`,
  features: [
    'LABEL_DETECTION',
    'SHOT_CHANGE_DETECTION',
    'TEXT_DETECTION',
    'SPEECH_TRANSCRIPTION',
  ],
  videoContext: videoContext,
};

const client = new video.v1.VideoIntelligenceServiceClient();

// Detects labels in a video
console.log(`Kicking off client annotation`);
const [operation] = await client.annotateVideo(request);
console.log('operation', operation);
- One line 1, we create a
videoContextwith some configuration settings for the API. Here we tell the tool that audio tracks will be in English (en-US). - One line 8, we create a request object, passing the path to our video file as
inputUri, and the location where we'd like the results to be written asoutputUri. Note that the Video Intelligence API will write the data asjsonto whatever path you specify, as long as its in a Storage Bucket you have permission to write to. - On line 12, we specify what types of analyses we'd like the API to run.
- On line 24, we kick off a video annotation request. There are two ways of doing this, one by running the function synchronously and waiting for the results in code, or by kicking off a background job and writing the results to a json file. The Video Intelligence API analyses videos approximately in real time, so a 2 minute video would take about 2 minutes to analyze. Since that's kind of a long time, I decided to use the asynchronous function call here.
If you want to play with this API quickly on your own computer, try out this sample from the official Google Cloud Node.js sample repo.
The Response
When the API finishes processing a video, it writes its results as json that looks like this:
{
  "annotation_results": [
    {
      "input_uri": "/family_videos/myuserid/multi_shot_test.mp4",
      "segment": {
        "start_time_offset": {},
        "end_time_offset": {
          "seconds": 70,
          "nanos": 983000000
        }
      },
      "segment_label_annotations": [
        {
          "entity": {
            "entity_id": "/m/06npx",
            "description": "sea",
            "language_code": "en-US"
          },
          "segments": [
            {
              "segment": {
                "start_time_offset": {},
                "end_time_offset": {
                  "seconds": 70,
                  "nanos": 983000000
                }
              },
              "confidence": 0.34786162
            }
          ]
        },
        {
          "entity": {
            "entity_id": "/m/07bsy",
            "description": "transport",
            "language_code": "en-US"
          },
          "segments": [
            {
              "segment": {
                "start_time_offset": {},
                "end_time_offset": {
                  "seconds": 70,
                  "nanos": 983000000
                }
              },
              "confidence": 0.57152408
            }
          ]
        },
        {
          "entity": {
            "entity_id": "/m/06gfj",
            "description": "road",
            "language_code": "en-US"
          },
          "segments": [
            {
              "segment": {
                "start_time_offset": {},
                "end_time_offset": {
                  "seconds": 70,
                  "nanos": 983000000
                }
              },
              "confidence": 0.48243082
            }
          ]
        },
        {
          "entity": {
            "entity_id": "/m/015s2f",
            "description": "water resources",
            "language_code": "en-US"
          },
          "category_entities": [
            {
              "entity_id": "/m/0838f",
              "description": "water",
              "language_code": "en-US"
            }
          ],
          "segments": [
            {
              "segment": {
                "start_time_offset": {},
                "end_time_offset": {
                  "seconds": 70,
                  "nanos": 983000000
                }
              },
              "confidence": 0.34592748
            }
          ]
        }
      ]
    }
  ]
}
The response also contains text annotations and transcriptions, but it's really large so I haven't pasted it all here! To make use of this file, you'll need some code for parsing it and probably writing the results to a database. You can borrow my code for help with this. Here's what one of my functions for parsing the json looked like:
/* Grab image labels (i.e. snow, baby laughing, bridal shower) from json */
function parseShotLabelAnnotations(jsonBlob) {
  return jsonBlob.annotation_results
      .filter((annotation) => {
      // Ignore annotations without shot label annotations
        return annotation.shot_label_annotations;
      })
      .flatMap((annotation) => {
        return annotation.shot_label_annotations.flatMap((annotation) => {
          return annotation.segments.flatMap((segment) => {
            return {
              text: null,
              transcript: null,
              entity: annotation.entity.description,
              confidence: segment.confidence,
              start_time: segment.segment.start_time_offset.seconds || 0,
              end_time: segment.segment.end_time_offset.seconds,
            };
          });
        });
      });
}
Building a Serverless Backend with Firebase
To actually make the Video Intelligence API into a useful video archive, I had to build a whole app around it. That required some sort of backend for running code, storing data, hosting a database, handling users and authentication, hosting a website--all the typical web app stuff.
For this I turned to one of my favorite developer tool suites, Firebase. Firebase is a "serverless" approach to building apps. It provides support for common app functionality--databases, file storage, performance monitoring, hosting, authentication, analytics, messaging, and more--so that you, the developer, can forgo paying for an entire server or VM.
If you want to run my project yourself, you'll have to create your own Firebase account and project to get started (it's free).
I used Firebase to run all my code using Cloud Functions for Firebase. You upload a single function or set of functions (in Python or Go or Node.js or Java) which run in response to events—an HTTP request, a Pub/Sub event, or (in this case) when a file is uploaded to Cloud Storage.
You can take a look at my cloud functions in this file. Here's an example of how you run a Javascript function (in this case, analyzeVideo), every time a file is uploaded to YOUR INPUT VIDEO BUCKET.
const functions = require('firebase-functions');

exports.analyzeVideo = functions.storage
    .bucket(YOUR_INPUT_VIDEO_BUCKET)
    .object()
    .onFinalize(async (object) => {
      await analyzeVideo(object);
    });
Once you've installed the Firebase command line tool, you can deploy your functions, which should be written in a file called index.js, to the cloud from the command line by running:
firebase deploy --only functions
I also used Firebase functions to later build a Search HTTP endpoint:
/* Does what it says--takes a userid and a query and returns relevant video data */
exports.search = functions.https.onCall(async (data, context) => {
  if (!context.auth || !context.auth.token.email) {
    // Throwing an HttpsError so that the client gets the error details.
    throw new functions.https.HttpsError(
        'failed-precondition',
        'The function must be called while authenticated.',
    );
  }

  const hits = await utils.search(data.text, context.auth.uid);
  return {'hits': hits};
});
- On line 3, I use
functions.https.onCallto register a new Firebase function that's triggered when an HTTPS GET request is made. - On line 4, I check to see if the user that called my HTTPS endpoint is authenticated and has registered with an email address. Authentication is easy to set up with Firebase, and in my project, I've enabled it with Google login.
- On line 12, I call my search function, passing the userid
context.auth.uidthat Firebase generates when a new user registers and that's passed when they hit my endpoint. - On line 13, I return search results.
Quick n' Easy Search
Next, I needed a way for users to search through my video archive. Because they wouldn't know exactly what terms to search for or what phrases to use, I needed my search implementation to be smart. It should be tolerant of typos and make good guesses for what users want based on their queries (just like Google search).
I was pretty intimidated by the idea of having to implement a search feature myself (ironic, since I work at Google!), until I stumbled across a Search API built a company called Algolia. Aloglia lets you upload data as json (which is conveniently the data format I had!) and then query that data from your app (or from their console, if you're debugging). Here's what the Algolia console looks like:

It deals with typos automatically, as you can see above, where I spell the word "Father's Day" wrong.
The tool also has a lot of different configuration options. You can adjust which json fields are searchable, how search results should be ranked, how much to tolerate typos, and more:

If you want to see some code samples, take a look at video_archive/functions/algolia.js. Here's the code for making a search query in Javascript:
exports.search = async function(query, userid) {
  const client = algoliasearch(
      process.env.ALGOLIA_APPID,
      process.env.ALGOLIA_ADMIN_APIKEY,
  );
  const index = client.initIndex(process.env.ALOGLIA_INDEX);
  const res = await index.search(query, {
    tagFilters: [userid],
    attributesToRetrieve: ['videoId', 'transcript', 'text', 'entity', '_tags'],
  });

  if (!res.nbHits) return [];
  return res.hits
      .filter((hit, index) => {
        return res.hits.findIndex((h) => h.videoId == hit.videoId) == index;
      })
      .map((hit) => {
        return {videoId: hit['videoId']};
      });
};
- On line 2, I provide my credentials and create a search client.
- On line 6, I specify which dataset or "index" I want to search.
- On line 7, I kick off a search query specifying both query text (e.g. "birthday"), "tags" to filter by (I used tags to associate data with users), and which json fields I'd like to receive.
- Line 14 looks kind of complicated, but I'm just filtering for duplicate movie ids and formatting a json response.
A Flutter Frontend
Because I'm not a very good frontend developer, I decided to use this project as an excuse to learn Flutter, Google's new-ish platform for writing code that runs anywhere (web, Android, iOS). Overall I had a lot of fun playing with it and thought styling Flutter apps was way easier than CSS. Here's the end result:
I just built a web app, not iOS or Android this time.
You can check out all the frontend code in the Flutter folder of the repo, but since I'm new to this, no promises it's "correct" ;).
So that's how you build an AI-powered video archive! Questions or comments? Ping me on Twitter!